TN#37 How to build a water-tight, thermally-efficient cavity wall
A well-designed cavity wall built from a high-density masonry material like clay brick offers two key benefits:
- It provides excellent insulation from temperature extremes and noise.
- The cavity prevents water from condensation from penetrating into the inner leaf.
What is a cavity wall
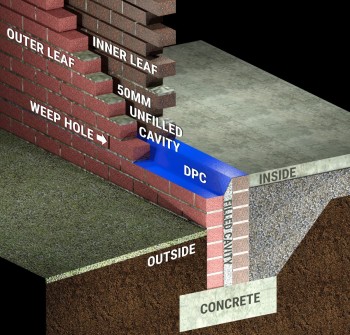
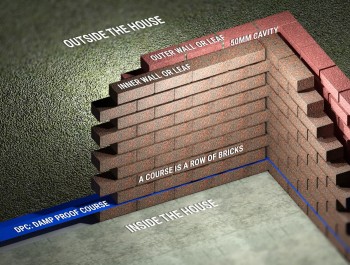
A cavity wall is composed of two masonry walls separated by an air space or cavity.
- Masonry must be laid on a level, rigid base. This is typically a concrete foundation or a beam of structural steel or concrete.
- The outer wall (or leaf) provides visual appeal. Clay face brick (FBA, FBS and FBX) offers a wide range of aesthetic options.
- The inner wall (or leaf) is usually constructed of NFP or NFX clay plaster bricks.
- In between the two masonry leaves is a cavity of 50 millimetres (mm). The gap must be consistent from the bottom of the wall to the top. This cavity must be kept free of mortar which can block water from draining away, leading to damp and mould. The wall cavity should extend to 150 mm below the damp-proof course (DPC) level. Below the damp-proof course, the cavity must be filled with fine concrete.
- The Damp Proof Course (DPC) keeps moisture away from the cavity side of the interior wall. It is usually a PVC sheet extending with a downward curve from the interior wall across cavity and through the outer wall. Its purpose is to drain away any water in the cavity towards the weep holes and discharge it outside.
- Masonry bricks are held in place with mortar typically composed of cement and sand.
- The cavity can be partly filled with insulation which is attached to the inner leaf. Insulation provides additional thermal performance.
- The two single-leaf walls are linked to each other with metal or plastic wall ties that are permanently fixed into the mortar of both brick leaves, crossing the cavity. The ties strengthen the cavity wall.
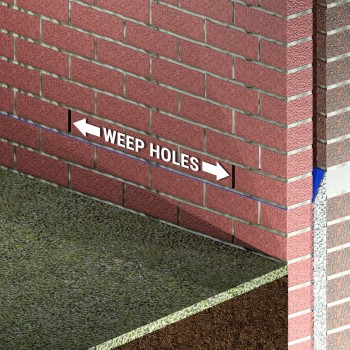
- Weep holes are drainage holes left in the exterior wall of the cavity wall. They are traditionally non-mortared gaps left between two adjacent bricks, to provide an exit point for water in the cavity. Plastic weep vents are also available.
Where does indoor condensation come from?
Think of your favourite ice cold beer! You take it out the fridge and within minutes water is dripping down the outside of the can and pooling on the table. Condensation is a result of cold beer inside the aluminium can or glass bottle, meeting warm air outside the container! Thicker glass slightly delays condensation, but won’t prevent it.
Condensation in buildings works in the same way. In coastal winter rainfall areas, condensation occurs when warm humid air in the interior of the structure comes into contact with the colder surface of the inner leaf, resulting in the water vapour in the air condensing into water droplets.
Similarly, you may have noticed that in cold weather, windows mist up on the inside and form water droplets that run down the window and damage interior paintwork. Any solid, single leaf wall – even one made from thick concrete – will experience condensation. You don’t want those droplets weeping inside your house!
With a cavity wall, condensation still forms, but it gathers in the cavity behind the 1st wall and never reaches the 2nd interior wall. The house remains warm and dry.
In South Africa, where are cavity walls required?
An important revision to SABS 10400 XA “Energy Efficiency in Buildings” of the National Building Regulations is expected to be published soon.
Key changes for external walls include:
- An energy zone map is used to set minimum total R-Value requirements for external walls.
- Cavity walls mandatory in terms of the revised SANS 10400XA for external masonry in energy Zones 1, 2, 4, 6 and 7. The minimum R-Value requirements for walls with a surface density greater than or equal to 270 kg/m2 is 0.5. Cities in these zones include Bloemfontein, Cape Town, Clarens, Estcourt, Johannesburg, Kimberley, Montagu, Port Elizabeth, Potchefstroom, Sutherland, Vryheid, Utrecht, Welkom and Witbank.
Tools & Materials for cavity wall construction
- Bricks: The standard Imperial brick is 222 mm long by 106 mm wide, and 73 mm high, and has a mass of approximately 3 kgs. There are 52-55 standard bricks per square metre. Allow 5-10% extra for breakages during transport and unloading. All measurements provided in this document refer to standard imperial size bricks. Others sizes of bricks are available, so measure your bricks and make adjustments.
- Mortar. Mortar accounts for as little as 7% of the volume of the wall, but has significant effect on the strength of the wall.
- Mortar sand should be free of clay and comply with SANS 1090 Sand for Plaster and Mortar.
- For 1000 standard bricks, use 0.6 m3 of sand (9 builder’s barrows) to 3 bags of 50 kg cement. A standard builder’s wheelbarrow is 65 litres.
- Do not mix more than you will use in 1 hour of bricklaying – mortar takes at least 20 minutes to set.
- Damp proof coursing (DPC): 200 micron PVC. The damp proof course prevents rising damp from the ground into porous masonry building materials.
- Wall ties: Butterfly or PWD wall ties in accordance with SANS 28 should be used for cavity construction. In coastal areas these are to be manufactured from galvanised wire, and in sea spray zones stainless steel grade 816.
- Bricklaying trowels
- Chisels are used to break bricks to create “half-bricks”
Step-by-Step construction
- Load-bearing cavity walls must be laid on a level, stable concrete foundation. The foundation trench width and depth must conform to the requirements of your local authority.
- Fill the trench with concrete to 150 mm below the ground level. The finished concrete must be level as it represents the start of the brickwork. If the ground slopes, the trench must be stepped to the height of 1 or 2 courses of finished brickwork (including mortar) so that the foundation itself does not slope.
- Mix the mortar (generally a Class 2 or 1:6 mix).
- Lay the first course/row of bricks for the inner leaf.
- Allowing for a 50 mm cavity between the walls, lay the first course for the outer leaf.
- Continue to add courses (rows) of bricks and mortar until the outer wall is 150 mm above ground level (2 courses = 170 mm).
- Fill in the cavity that will be below the damp-proof course with solid, fine concrete so that groundwater cannot seep into the empty cavity.
- Lay the next course on the inner wall only.
- Measure and cut the damp-proof course (DPC)
- The damp-proof course should be laid as a single, waterproof sheet from the inner edge of the inner wall, to the outer edge of the outer wall.
- Sandwich the DPC on the inner wall between the existing bricks and lay a second course on the inner leaf to hold it in place.
- Sandwich the DPC on the outer leaf between the existing bricks and a new course.
i.e. the DPC should step down one course from the inner leaf of bricks to a lower level on the outer leaf.
The DPC is sandwiched between 2 half beds of mortar. It provides an effective seal against rain penetration and rising damp. Any water entering or condensing in the cavity is automatically guided to the outer wall and out the weep holes.
- Continue to lay further courses of brick alternating the inner and outer leaf using the bonding pattern of your choice.
- The cavity above the damp course between the internal and external leaf should be kept clear of mortar and debris, to ensure that any moisture in the cavity can easily flow to the outer wall and out the weep holes. A timber batten suspended in the cavity and raised as the work proceeds during its construction, will help keep the cavity free of mortar droppings. Wall ties crossing the cavity must also be kept free from mortar droppings.
Special Points to be observed in cavity wall construction
- Jointing. A smoothed, half round bucket handle joint is recommended in coastal and inland high rainfall areas to minimise rain penetration.
- Some bricks may be temporarily left out at the ground floor level to give access to the bottom of the cavity, in order to clear mortar droppings at the end of each day’s work.
- Weep holes (joints left open without mortar) are vents incorporated into masonry near the base and top of the wall to prevent stagnation of air and excessive humidity.
- Do not close off cavity walls at the sides of door and window openings unless a vertical “damp-proof course” is inserted to prevent water driving to the inner face.
- The cavity wall should not be filled below window sills. A damp-proof course is desirable at this point also.
- A trough or gutter of galvanized iron or other suitable material may be placed in the cavity above all openings for exposed doors and windows to collect water which may penetrate the outer leaf or enter at where the wall and roof join.
- Just below the roof line, the cavity can be filled for two or three courses to stiffen the head of the wall and distribute the load over both leaves.
Keeping your wall straight and even
- Measuring tape and Marking pegs are needed to demarcate the exact location of walls and corners.
- Use a Spirit level to keep each course horizontal.
- Measuring poles will keep rows of bricks level on either side of openings like doors or windows, and keeps mortar even from side to side, and top to bottom.
- Use doweling rods that are the height of the finished wall. Set a measuring pole vertically at 90 degrees at each end of the wall (or every 4 metres for long walls). Using measuring tape and a spirit level, mark out the height of each brick course on the poles (one brick plus one mortar joint)
- A standard brick is 222 mm x 106 mm x 73 mm
- Mortar joints of 12 mm are recommended.
- Measurement marks on the pole are therefore at 85 mm, 170 mm, 255 mm, 340 mm, 425 mm etc. above ground level.
- Tie string or builder’s line between these measuring poles to mark a straight horizontal line, moving it up as you complete each brick course or row.

